EDA365电子论坛网

标题: itop4412开发板Qt串口编程-实现串口功能 [打印本页]

作者: 阳阳天    时间: 2021-4-15 10:47
标题: itop4412开发板Qt串口编程-实现串口功能
1.编辑工程文件(后缀为 .pro 的文件)在 QT += core gui 后添加 serialport。% [* G3 Y" E7 c2 \
! B' I' W* J. }) `/ r9 j) x
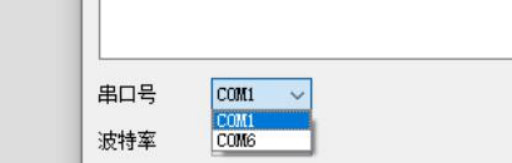
2.自动获取串口* T* _3 R+ Q9 d+ Q, i9 H' R
使用 QSerialPortInfo:::availablePorts()获取当前串口,该函数返回容器类 Qlist,用 Qt 定义的关键字 foreach 遍历容器 Qlist 里的串口信息,并将串口信息放到 QStringList 的类对象 serialNamePort,显示到 ui 的串口组件。
, k/ q6 O8 f0 S3 K2 e0 ~# _{
( ~: T: w; R7 `# V& G6 @, L{. E& L% v; N$ M: X! `; _
ui->setupUi(this);2 b+ f% k5 d& S
QStringList serialNamePort;1 V* F# J; @" ~" r+ Y8 ^
//遍历:availablePorts()返回的串口信息) n. M+ s" [: W7 z2 s) @! _8 }; _
foreach (const QSerialPortInfo &info, QSerialPortInfo::availablePorts()){% a; R! |! o. n" D9 q
serialNamePort << info.portName();
# F1 g! ~6 M/ b* ^2 ]7 K- E3 x}7 \5 q7 h( e( J, N  _
ui->serialCb->addItems(serialNamePort);; h8 W4 c8 O$ T/ p5 u
}
& l; u; [8 }" Z" R, k$ p8 c1 f编译后点击串口选择框,会出现已经连接的串口。) n7 l5 p+ H# ^  D
* y  v( K" R: u
3.打开串口功能和属性设置7 Q7 G+ ^: n4 f& o8 l! g1 |2 x
步骤一:实例化串口类 QSerialPort 对象 serialPort,对串口的操作就是对 serialPort 对象的操作,调用QSerialPort 封装的成员变量(属性)和成员函数(功能)就能控制串口。2 P2 f7 ]7 x: ^$ K! ?
class Example : public QMainWindow
5 f1 v; s" @1 |! `: D7 n{" ]9 b; I$ k: K8 q
public:
' k9 J7 N2 `& p) o+ ^% s.......... QSerialPort * serialPort;
0 `* k% S: f" c7 \8 }/ V.......... };5 ^, c7 U7 S# K, q
ui(new Ui::Example)
5 v  e& v# l  G5 A4 [# p" ^{$ N; w0 l. M. D" x4 u6 z
ui->setupUi(this);
" ?9 ?- m5 l+ b......
; ?8 |+ [; Q9 |9 Y! |7 x' f/ Z2 _0 q$ JserialPort = new QSerialPort;) ?" z2 z* U+ C9 {  D
...... }
6 [/ L2 v2 Q( z* Q步骤二:填充波特率,数据位,停止位,校验位等属性。获取 ui 组件传递过来的串口信息,将串口属性填充到 serialPort 对象。" y+ I( f8 |0 S! U
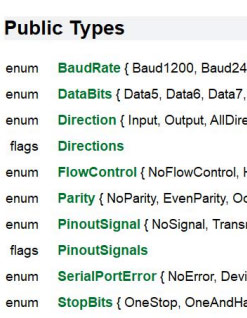
' U# z& X. n4 u; h! J4 D: m
步骤三:打开串口,判断是否打开成功。
' o/ P9 \2 |7 i: _4 r! H/*打开按钮*/% v/ q* R) T  k+ O) D# X5 {2 L
void Example:n_openCb_clicked()0 i3 c2 a% ~8 _- n3 I
{
4 v  j5 @5 ?1 o8 ^3 D2 qQSerialPort::BaudRate bauRate; //波特率
# W6 q, a: e6 u1 [QSerialPort:ataBits dataBits; //数据位3 _- F1 ]  ]0 T$ A. b( ]
QSerialPort::StopBits stopBits; //停止位
5 L6 p3 F6 i2 p/ nQSerialPort:arity checkBits; //校验位1 ?$ `% T# }6 J9 I5 l  `, H' P, L- |
//设置波特率7 ]! n+ u9 j0 b1 N
if (ui->baudCb->currentText() == "4800" ) { bauRate = QSerialPort::Baud4800; }/ H5 d% T# [) c6 T+ Y6 p
else if(ui->baudCb->currentText() == "9600" ) { bauRate = QSerialPort::Baud9600; }
& _6 F8 d$ S  telse if(ui->baudCb->currentText() == "115200") { bauRate = QSerialPort::Baud115200;}( L( x5 F# E" Y9 m
//设置数据位2 P5 `; n# \1 A4 y7 _, u5 w0 s" Z
if (ui->dataCb->currentText() == "5") { dataBits = QSerialPort:ata5;}
& X" X- I( t" H6 A- r' uelse if(ui->dataCb->currentText() == "6") { dataBits = QSerialPort:ata6;}
  H6 |& L! C2 c' Qelse if(ui->dataCb->currentText() == "7") { dataBits = QSerialPort::Data7;}
; _; n& }& @1 t6 `' ]3 U7 ~else if(ui->dataCb->currentText() == "8") { dataBits = QSerialPort::Data8;}
3 C0 A& q* ]: D/ ^//设置停止位
$ ^8 e: O! j2 ~/ k1 Xif (ui->stopCb->currentText() == "1" ) { stopBits = QSerialPort::OneStop; }
9 s- `+ V5 w) F4 Y8 celse if(ui->stopCb->currentText() == "1.5" ) { stopBits = QSerialPort::OneAndHalfStop; }9 n3 t1 B1 h% L, W( j- u! {  O
else if(ui->stopCb->currentText() == "2" ) { stopBits = QSerialPort::TwoStop; }
7 u+ S# w# H: b$ y2 |% f3 v$ L5 _//设置校验位7 p* w; H" y! ?0 X( h1 G0 E$ W
if(ui->checkCb->currentText() == "none" ) { checkBits = QSerialPort::NoParity; }
2 h7 `! i+ w( o0 ^0 j//填充串口对象的属性值4 q; F+ H2 P" s1 ~7 @( M7 \
serialPort->setPortName(ui->serialCb->currentText());. ^. f* P8 x& Y5 s
serialPort->setBaudRate(bauRate);
" Z- `( B; O1 a/ \serialPort->setDataBits(dataBits);: v3 a* N2 X/ g6 W1 c2 N# g; i
serialPort->setStopBits(stopBits);! v9 Y. q: g+ ^! Z6 I/ }
serialPort->setParity(checkBits);
9 o7 F. Q/ m' _9 W- w8 m( Y: S- C* b3 l//设置好属性后打开串口
% y9 a2 w) ]6 l! f$ B: B" xif(serialPort->open(QIODevice::ReadWrite) == true){
1 a- t; M1 q# D2 P$ |QMessageBox::information(this,"提示","成功");
; p4 L) L: E+ `5 ?, }# j# j}else{+ P1 N1 w1 H2 x$ o7 s4 T
QMessageBox::critical(this,"提示","失败");2 t/ ~* m( f) i
}* ^- K- A9 @1 w: I+ X/ v1 [" [* k
}
5 X. _/ j2 J, \4.收发串口数据功能
& P  E9 M0 i8 S4 ^读数据:每当数据流从串口到达系统一次,就会传到 Qt 应用程序一次,readyRead 信号就会触 发 一次,所以可以用前面章节讲的信号和槽机制将 readyRead 信号和槽函数绑定,然后就可以在槽函数中读取串口数据。槽函数中使用 readAll()读取数据,使用带换行功能的 appendPlainText()显示到 ui 的接收窗口。
' W  m* A1 @" D; l//类中声明槽函数
" ]5 z5 o/ d/ g% ~1 kprivate slots:/ I% z( k$ _0 K' {5 z# F
void serialPortReadyRead_Solt(void);/ t. p0 W! a; e1 Z  u8 C
//readyRead 信号和槽函数绑定8 U9 x% Z0 L5 R* F7 r
connect(serialPort,SIGNAL(readyRead()),this,SLOT(serialPortReadyRead_Solt()));
3 E( _' ~5 z. ]2 z0 ?//读串口
& t2 n: S; S# I' Nvoid Example::serialPortReadyRead_Solt(void)
  v+ v) M& f& F{
, \9 U6 F% N3 h% [% r. V9 jQString buf;
; q; R* I0 J1 r/ I6 Rbuf = QString(serilaPort->readAll());+ Y1 K6 L  a3 p# }* ^  [+ r
ui->recvEdit->appendPlainText(buf);
% l$ z6 q# r4 c$ Y  h}
+ j  x1 I3 G. d1 {6 i写数据:获取 ui 界面填写的信息,ui->sendEdit->text(),使用 QSerialPort 的成员函数 write 将数据写到
5 i: x4 ~1 L$ S串口。4 s' c* y$ Q# J& q3 u
void Widget:n_sendBt_clicked()
6 v. f7 a7 |: N& S0 y  Z{  h# L( V2 w+ A; m' u3 O1 g; }
serilaPort->write(ui->sendEdit->text().toLocal8Bit().data());
1 r$ [$ H1 N0 I2 l" q! w3 \, Q" g}
: a& c. c4 x# s+ i! ^! `  M5.关闭串口功能: {8 m) p% r' l  I5 ^) F8 T
使用 QSerialPort 的成员函数 close()关闭串口。
5 F* V' j$ @. @+ N" Rvoid Widget:n_closeBt_clicked()
) G. l. Q! W/ U4 E{* x7 M% q. L' n' _) [# M0 G
serilaPort->close();) A& m5 {- a& B% Z* Q" D
}
6 X. s$ G1 Z, N7 M( _) C4 ?. {) y6.清空发送栏数据7 O/ Q  T8 B. d' d+ e' z- N
调用 ui 组件 lineEdit 的成员函数 clear 即可清空数据。
0 z& L/ x; r; s2 a, hvoid Widget::on_clearBt_clicked(). ^  q  S9 B/ I/ \% D7 |5 m! ]
{0 d% l# Q( ^' J
ui->recvEdit->clear();! ]0 g- r$ Z/ c8 o
}
/ t: a7 v; J4 `6 Y% b) V+ p) M# _编译测试,结果如图:
3 y6 b7 W/ O' x0 V
8 {1 v, }9 u9 m$ @
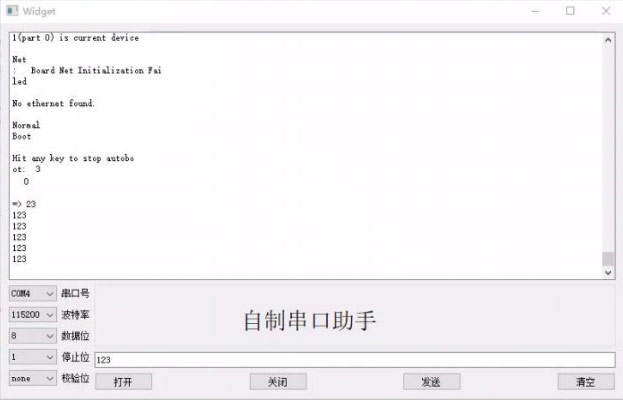
. C! d7 @* [+ M" e" r( _

作者: grand    时间: 2021-4-15 13:15
itop4412开发板Qt串口编程-实现串口功能,很好的分享,收藏了。


欢迎光临 EDA365电子论坛网 (https://bbs.eda365.com/) Powered by Discuz! X3.2